Welcome!

This blog is now exclusively devoted to crafting in general, and the shop in particular! Pretty much all of my personal content has been moved to a new blog, one that is intended primarily to help keep our family and friends in the loop. (If you are interested in following the new blog, you will find it here.) This blog will continue to feature shop news, new listings, sales, giveaways, and all of my share-worthy crafting exploits.
Showing posts with label sewing. Show all posts

Sunday, September 22, 2013

Malcolm's Nursery Set

Or, More Proof That I Haven't Been Idle.

Shortly after learning that my brother- and sister-in-law would be having their first child late this summer, I found the perfect nursery panel on clearance at work.  There were only 3 left on the bolt, so I bought all 3.  One panel is still being made into a quilt-style blanket.


The panel itself consists only of the various-sized animal blocks.  I added the light brown border to it, and backed it in the same fabric.  (It's a Keepsake Calico print from JoAnn's.)  The part that looks like a white border is actually a lightweight cotton batting.  I went over all the straight lines in the panel with the sewing machine to help it look more genuinely quilted, and I'm still in the process of outlining all the animals by hand.  Once I'm done with that, I'll cut down the extra batting and square it up before binding it.  

I cut up the second panel to make all sorts of fun things.  The large giraffe and crocodile block became a small, lightweight baby blanket.  There's no batting, but I did back it in a soft yellow cotton flannel, and bind it with pre-made double-fold bias binding from Wrights.


The twelve tiny squares became a set of two plush cubes, one of which has a rattle inside, so that little Malcolm has something soft and bright and colorful to look at and play with.  I used a mid-weight stabilizer to help reinforce the fabric, and help them to hold their shape.  If I do something like this again, I think I might use a heavier stabilizer, but I don't want them to be too stiff.  Hmm...


And the three large blocks I turned into wall art for the nursery.  I bought 3 12x12 canvases from Michael's and decoupaged the fabric squares onto the canvases.


Cute, right?  I haven't done anything with the last panel; maybe I'll make a blanket for my own little boy, now that I'm expecting again.  But I didn't stop there on Malcom's goodies.  I've had this Heather Bailey pattern since before we left Germany, but I'd never made one.  I thought this would be the perfect time to give it a try.  The fabric (a fat quarter from JoAnn's) and the bit of ribbon (for the tail) both came from my stash, and match the rest of the set very well.  Unfortunately, he's so tiny that I had to stitch him entirely by hand and I'm not sure how much abuse he'll be able to take.


A few weeks after discovering the panels in the clearance section, I found a coordinating fabric still with the rest of the nursery fabrics.  There was only a little left, so I bought all of that too, even though at the time I had no idea what I would do with it.  As it turns out, I had just enough to make a Boppy cover for her.


I used this pattern that I found on Etsy, and holy cow, it could not have been easier.  The pattern says that it's a 30 minute project, start to finish, but it took me about an hour.  (Maybe Corinnea or Kelly could have done it in half an hour, but I've not reached their Guru status yet.)   I think that I will be making some changes next time, though.  For one, I want to try using a zipper next time, instead of the overlapped opening that this one has.  It was really super easy to put together, but getting the pillow into the cover is a bit of a pain.  And the cover ended up being a little too big for my Boppy, so I think I will widen the seam allowance a bit.  We'll have to see how it fits Carrie's Boppy, first; hers is newer and may be bigger than mine.


The last thing is a fitted crib sheet.  I used this tutorial, and it was every bit as easy as making the Boppy cover.  The finished sheet fits both of our crib/toddler mattresses to perfection, so I won't be changing a thing when I make the next one.  (There will be a next one.)  I'd wanted to use that leafy fabric (that I ended up using for the Boppy cover) for the sheet, but I didn't have quite enough of it.  With the help of one of the other girls at work, I found this Quilter's Showcase print that's a perfect match for the orange in the panel fabrics, and compliments the rest of the set rather well.


Not too shabby, huh?  It's only taken me....what, 6 months to get all this together?  I'm such a procrastinator.  Now that my poor nephew is more than 6 weeks old, I'm finally getting around to sending a box for him... He'll have to wait for his wall art, because I haven't been able to find a box to fit them, and the big blanket is going to be a Christmas gift, but everything else will be heading his way this week.  :)


Sunday, April 28, 2013

Robin's Aprons

Now that she's married, Robin has been doing a bit more cooking.  And, now that she's doing more cooking, it occurred to her that an apron or two might come in handy.  This is where I come in.   She asked me to make two aprons (one to wear and one to wash) in greens and purples.  I already had the Emmeline Apron pattern in my stash and she liked it, so that's what we went with.  


All of the fabrics for this one came from JoAnn's, except for the green trim on side one, which came from my stash.  (I still have a ton of that green, and I really love that combination...I may need to do something else with it in the future...)


This time, everything is from JoAnn's except for the main fabric on the green side.  As you can see, the belt can be tied in the back, or wrapped around to the front.  The top straps can be tied around the neck as a halter, or crisscrossed over the back and tied to the belt.  I added a pocket to both sides of both aprons, as requested. 

Unfortunately, almost immediately after finishing these and moving on to my next project, I started having issues with the tension on my machine.  The bottom thread is so tight, and the top is so loose, that I can just slide the bottom thread right out.  I have no idea how it got that way, or how to fix it. I tried adjusting the tension both on the top and the bottom, with no discernible change.  Someone at work recommended that I try oiling the machine; I'll give that a try tomorrow, and hopefully I'll be back in business!!


Tuesday, February 5, 2013

Kindle Cover

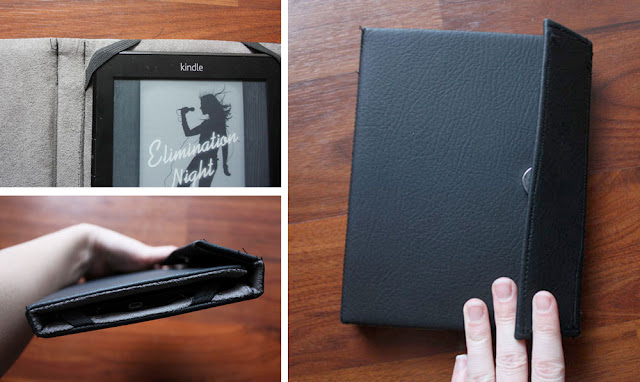
Brandon won a new Kindle at the Christmas party in December, and I knew immediately that I would need to get him a Kindle cover for Christmas.  But, I couldn't find any that I liked at a reasonable price.  Seriously, there are covers out there that are nearly as expensive as the Kindle itself!  So I decided to make one.  After all, how hard could it be? I found this tutorial on Pinterest and tried adapting it to open horizontally and include a magnetic closure.  


Well, it was harder than I thought.  I used an upholstery pleather for the outside, suede cloth for the inside, and auto headlining to cushion it, all over a book board base.  It took three attempts to achieve the above cover, and it was still not right.


The elastic straps were too small to hold the Kindle in place; it would hold either the top or the bottom, but not both, and it kept just falling out. It also wouldn't close properly, which made me a little nuts.  I'm not sure if I made the right edge too short, or if the magnet placement was off.  It was probably a little of both.  Anyway, I ran out of time, and this is the cover that I gave to Brandon for Christmas.  I told him right off that I would be redoing it, because it wasn't good enough.


This is the fourth attempt, and while it still isn't perfect, it is a vast improvement.  I did away with the top flap and magnetic closure completely, so that it just opens like a book.  I also skipped the narrow piece of book board in the middle, so that the "binding" flexes easily.  I made the elastic straps a lot longer, and brought them in farther, so that the Kindle now stays in place without any problems.  


Sunday, December 30, 2012

Floor Cushion

For my brother- and sister-in-law, I made a floor cushion (or mini ottoman) and matching (lumbar?) pillow for him to use at his desk, or for her to use whenever.


I used the same "pattern" for the cushion as for the ones I made for the girls, but this one is filled with polyfill rather than the microbeads.


They're both over-stuffed, because I wanted them to stay full even after the polyfill settles.  I really like the way that they turned out---except that the red of the piping does not match the red of the fabric.  I didn't think it would be so obvious when I chose the materials, but it is.  Boo.


Saturday, July 21, 2012

As Seen on Pinterest: "Land of Nod Inspired Floor Cushion"


A few years ago, I made a pair of bean bag chairs from Amy Butler's gum drop pillow pattern.  I was sure that I'd blogged about them at the time, but I couldn't find the post in my archives so I'll tell you about them now.  The pattern said to fill the pillows with polyfill, but I wanted bean bag chairs for lounging in front of the TV.  I spent a small fortune on the tiny polystyrene beads used for filling bean bags, and had Brandon help me get them filled.  They made great bean bags chairs, and lasted us through a good four years of abuse use.  Recently, though, I noticed that one of the seams on the brown one had started to come open, and was leaking those filler beads. It wasn't bad yet, but I knew it wouldn't take long for them to be all over the place.  

Enter Pinterest.  I'd seen and pinned this tutorial for Land of Nod inspired floor cushions quite some time ago, but happened to see it again right around the time that I noticed the bean bag leak.  Coincidence?  No, I think it was Destiny.

photo from original post on Living With Punks
Ok, so maybe it wasn't Destiny, but it certainly was convenient.  I headed on in to JoAnn's to get some home dec fabric, and lo and behold, they had the perfect brown and cream floral on clearance for $5 a yard.  They didn't have the ready-made piping in the right color, though, so I snagged some quilt binding and made my own.


If you've never done piping before, it's actually pretty easy.  This is the tutorial I used the first time I did it, and it helped a lot.  Since I bought the quilt binding, I got to skip the part where I have to cut the bias strips, which made me very happy.  All I had to do was open up the binding, press it flat, cut it in half lengthwise, and voila! I turned 3 yards of quilt binding into 6 yards of 1.5" bias tape.  


And I didn't have a compass, and really didn't want to mess with doing that anyway, so I just went looking for the biggest circle in my house, which turned out to be the lamp shades on my bedside lamp.  I ended up with a 16" circle, instead of her 17" circle, and I decided to make the outer panel 10" instead of 9", so it would be a little taller.


When it came time to do the handle, instead of folding the ends in on themselves and stitching it to the top of the outer panel like she did, I stitched them into the outer panel when I pieced it together.  


My fabric was only 45", so I had to add about 7 inches to it to make it long enough to go all the way around the circle.  That 7" panel was just about the right width, so the handle was stitched onto it at either end.  Then I went back and top stitched it with the X, and I think it looks a lot better.  The only other thing I changed was to fill it with the polystyrene beads from my leaking beanbag, rather than using polyfill.  


We had some filler left in that beanbag, and the first one turned out so well that I had to make a second one. I was originally going to make them exactly the same, but I accidentally cut the strip for the outer panel at 6" rather than 10".  I stared at it in consternation for a moment, then decided it would be cool to have 2 cushions at different heights.  (Photography props, anyone?)


I am in love with the way they turned out. They match my decor to a "T".   I even got the piping right.  I had to sacrifice some of the filler from the green bean bag for the second cushion, but I don't care.  The new cushions are perfect.  They're really full, so they're really firm and don't sink down too much when someone sits on them.  The big one is the perfect height for Elora, the little one is the perfect size for Kaylie.  They can be stacked for extra height.  I like sitting on them, especially when playing with the girls at the coffee table. 


Seriously, what is not to love?  I'm already wanting to make more.  My MIL has requested one.  Or two.  And how does it work, if I want to offer custom cushions in my shop, since I got the idea from someone else's tutorial?  Would any of you purchase something like this?


Thursday, July 19, 2012

Beachy Things

We finally made it to the beach last weekend.  (I say 'finally', but really, we're way ahead of the game compared to last year.)  Elora asked us Friday if we could go to the beach "to get a shell for Mama", and we said, sure, we'll go on Sunday.  She then spent the next 48 hours asking, is it Sunday yet?  And when it finally was Sunday, the question changed to, is it time to go to the beach yet?  We got a later start than intended (we always do) but we did make it out there.

Did you notice that Elora isn't wearing a swim diaper under her suit?   She is DONE with diapers of all kinds, even at night and out and about!

Unfortunately, we were there right around lunch time and the sun was pretty intense.  We were all  wearing SPF 85 sunscreen, but we still got some sun.  
We did stay for about 2 hours.  Brandon and Elora were in and out of the water or playing in the sand the whole time.  Kaylie and I just stood in the surf, played in the sand, and had a snack.  (Elora was too busy playing to eat a snack.)  I wish I'd gotten more photos, like of the wall and pool that I built between Kaylie and the water so that the waves wouldn't get her, since she liked the sand but not the random waves.  They'd just wash against the wall and fill the pool.  We ended up with a few other kids playing with us, scooping out sand, and looking for periwinkles and sand fleas.  But we were too busy having fun to bother with the camera.  We did get a family photo, or at least, we tried. 


We had another beach-goer take some pictures of us all together, but one of us (me or her) managed to bump the aperture dial and it was turned waaaaaay too low. This is as much detail as I could get out of it.  It's kind of a neat picture, though.

And yes, that goofy picture on the left was the best shot of the front.


Saturday night I up and decided that I had to have a new swimsuit cover-up.  I still had my Anna Maria Horner Little Folks viole squirreled away, so I dug it out and went to work.  I didn't use a pattern, or even a tutorial, I just made it up as I went.   It's shirred around the high waist, and the bodice (such as it is) is made from 2 triangles, gathered at top and bottom. It took me 3 tries to get the bodice pieces right, and two tries to attach the straps, but it turned out ok and I even have enough fabric left to make another little sundress, one that can be worn to places other than the pool or the beach.  

PS:  Don't forget about the giveaway!  You have until tomorrow to win a custom designed printable of your choice from The Green World Shop!


Tuesday, June 19, 2012

Old Sheets into New Dress

The other reason for the Father's Day photo shoot was to get some pictures of Elora's new dress.  I had an old, old pink-and-orange-on-white striped sheet that's been around for as long as I can remember.  It was so old that when I took it apart, I didn't even have to bother with the seam ripper, I just pulled it apart with my hands.  It was stained and paint spattered, and until recently, had lived in my beach bag.  For whatever reason, I decided it would make a cute dress.  


I used the body of the printed sheet for the body of the dress, the trim from across that sheet for the straps, belt, belt loops, and bottom trim, and a flat sheet from the thrift store to line it. I started with Corinnea's recipe (did you ever post that tutorial?) for a simple shirred dress, but instead of doing front and back panels, I sewed it all into a tube and shirred it all together in a continuous spiral.  This went much faster, and wasted a LOT less thread that the way I'd done it in the past.

Kaylie's wearing the dress that I made for Elora last year.


The sheet I used for lining was a bit heavy, so I think I will try something else for that, next time. I'll for sure be making more of these, they're so fun!  If I can find Corinnea's little tutorial, I'll try to post it.  :)


Wednesday, March 14, 2012

Jessie's Outfit


Elora's made-by-Mama birthday gift is a Jessie costume to wear at her party, and any time she wants to play dress up.  


I took a cotton knit shirt from Target and a pair of jeans and added to them.


The binding on the collar, the red loops, and the cow print on the jeans were added by hand.  The rest was machine stitched.   I wasn't trying for an exact duplicate of Jessie's outfit, just an approximation.  For example, I didn't even try to bring the yellow panel down to points on the shirt.  She already has a little pair of brown boots, and I ordered a hat from The Disney Store to complete the look.

Edit:  Ack!  I just realized that I forgot the gray buttons on the shirt.  Should I add them, or just let it go?

So excited for the party---this weekend!!

Tuesday, February 21, 2012

Kaylie's Towel Hoodie

  Kaylie will be getting a hoodie towel for her birthday!  Elora has had one since she was an infant, and we have always used it.  I've been meaning to make one for Kaylie since she was an infant.  It only took me a year, but it's done!


I'm so tempted to just start using it, rather than wrapping it up and waiting for her party.  She's not going to know the difference, right?  But I will wait.  We've made do without it for this long, we'll make do for another few weeks.


I used one full sized bath towel and two hand towels.  I almost chose pale baby colors for it, but I picked super bright colors instead, and I'm loving it!  And I just happened to have a perfect coordinating ribbon at home, which I didn't know until after I bought the towels. 


It was meant to be.  The K on the front ended up being larger than I'd intended because the towel stretched as I sewed it on.  And I didn't have matching thread when I started the project, so the orange K is outlined in pale pink.  It looks ok, but it would have looked a lot better if I'd used orange thread.  You will notice that the yellow K is outlined in yellow. 


This is my current project.  Can you guess what it is?